These little chocolate souffles seem like a special occasion dessert, but are actually quite easy. They can even be made ahead and frozen until you are ready to bake them. I like to make them for our New Year's dinner. This recipe should make four to six souffles, depending on the size of your ramekins. I usually get six.
Chocolate Souffles
5 oz good quality, bittersweet chocolate
5 Tablespoons unsalted butter
1/2 cup sugar
2 large eggs and 2 egg yolks
1/4 cup flour
dash salt
Butter and sugar individual souffle dishes. Melt chocolate and butter in a medium bowl over simmering water, stirring occasionally. Allow to cool to lukewarm.
In a large bowl, beat sugar, salt, eggs and yolks in large bowl 5 minutes at high speed. Sift flour over mixture and fold in. Gradually fold in lukewarm chocolate mixture. Divide among prepared dishes.
Bake at 400 degrees, until puffed on top and beginning to crack - about 15-20 minutes. Center should remain soft. Carefully unmold into serving dishes and serve warm, with cream.
Sausage, Apple and Cranberry Stuffing
I have to admit. I'm not a big fan of turkey, so for me it's all about the side dishes, starting with the stuffing. For at least a decade, we tried a different stuffing recipe every year until we hit on this one. With the bright red dried cranberries, it even looks good.
Sausage, Apple and Cranberry Stuffing
5 cups bread cubes, white, wheat or a combination
1 pound good quality pork sausage
1 apple, cored and diced
3/4 cup dried cranberries
1 cup chopped onion
3/4 cup chopped celery
1/3 cup minced fresh parsley
2 1/2 teaspoons dried sage
1 1/2 teaspoons dried rosemary
1/2 teaspoon dried thyme
Giblets, if you have them, cooked and chopped
3/4 cup turkey or chicken stock
4 tablespoons melted butter
|
Panna Cotta

We like having dessert as much as the next family, but we generally prefer something simple and not too sweet. This Panna Cotta recipe is just the thing for those occasions. Adjust the sweetener depending on the level of sweetness you prefer.
Panna Cotta
2 cups heavy cream
2 tablespoons sugar, or honey if you prefer
1 teaspoon of vanilla
2 teaspoons gelatin
1 teaspoon of vanilla
2 teaspoons gelatin
1. Heat 1 1/2 cups of the cream and the sugar over low heat until sugar is dissolved and cream is hot, but not boiling. Remove from heat and stir in the vanilla.
2. While cream heats, sprinkle the gelatin over the remaining cream in a medium-sized bowl and let stand 5 to 10 minutes.
3. Pour the very warm cream and sugar mixture over the gelatin and stir until the gelatin is completely dissolved.
4. Divide the Panna Cotta mixture into lightly oiled custard cups for unmolding into serving dishes, or into goblets or other decorate glasses to serve without unmolding. Chill several hours, or until firm.
5. If unmolding, run a thin sharp knife around the edge of the cup. Unmold onto serving plate
6. Garnish as desired
Four servings
Quiche Lorraine

Eggs are so versatile and nutritious, and though the local, soy-free eggs we buy are rather expensive, they are cheaper than many other foods, so we try to have them quite often. One of those ways is in a quiche.
There are so many varieties of quiche, and maybe it's just the bacon, but I usually fall back on Quiche Lorraine. Hot for dinner, or cold the next day in my lunch, it's one of my favorites.
Quiche Lorraine
Pastry for 9 inch pie crust
8-10 slices bacon (depending on size - or even more if you like), diced and fried until crisp
4 oz shredded Swiss Cheese
1/2 minced onion
4 eggs
2 cups cream
1/4 teaspoon salt
Heat oven to 425 degrees. Sprinkled bacon, onion and cheese in pastry lined pan. Beat eggs until uniform yellow, then add cream and salt.
Pour into pie pan. Bake 15 minutes. Reduce oven heat to 300 degrees and continue baking 30-40 minutes, or until knife inserted 1 inch from edge comes out clean. Allow to stand 10 minutes before cutting.
Peppermint Bark Cookies

Peppermint Bark Cookies
1 cup butter, softened
3/4 cup brown sugar
1/2 cup sugar
1 large egg
1 teaspoon vanilla
1 3/4 cups flour
3/4 cup unsweetened cocoa powder
1/2 teaspoon each baking soda and baking powder
1/4 teaspoon salt
1 cup peppermint bark, chopped into chip sized pieces
Cream the butter and sugars together for about two minutes or until light and fluffy
Add the egg and vanilla and mix thoroughly
Sift together the flour, baking soda, baking powder, salt, and cocoa powder and add to butter mixture
Fold in the peppermint bark chips.
Drop by spoonfuls onto baking sheet. Bake at 350 degrees, 10-12 minutes. Cool on pan for a few minutes before transferring to wire rack to cool completely.
Makes approximately 3 dozen cookies.
Broccoli Soup
This is one of our favorite soups, especially with our home-grown broccoli. It's also good with cheddar cheese.
Broccoli Soup
3 tablespoons butter
1/4 cup onion, chopped
2 cups broccoli, chopped
1 teaspoon thyme
3 tablespoons flour
3 cups homemade chicken stock
1 cup cream
salt and pepper to taste
Melt butter in a saucepan. Add onions and broccoli and saute for 5-7 minutes, or until soft.
Stir in thyme and flour and cook for a few minutes. Add stock and bring to boil. Reduce heat and simmer until vegetables are soft.
Blend to desired consistency. Stir in cream and heat through.
Poppy Seed Bread

My recipe is an old one. It dates from the days when people shared recipes on decorative little index cards rather than on the internet. About 20 years ago, a friend gave me one of those little cards with this recipe. I've altered it slightly to decrease the sugar and used butter and coconut oil instead of margarine or seed oils.
Poppy Seed Bread
1/2 cup melted coconut oil, butter or a mixture of both
1/2 cup sugar
2 eggs
1 teaspoon almond extract
1/2 teaspoon vanilla extract
1 1/2 tablespoon poppy seeds
1 1/2 cups flour
3/4 teaspoon salt
34 teaspoon baking powder
3/4 cup milk
Glaze:
1/2 tablespoon melted butter
1 tablespoon orange juice
1/4 teaspoon vanilla
1/2 teaspoon almond extract
1/3 cup powdered sugar
Melt butter and/or coconut oil. Mix in sugar. Add eggs one at a time, mixing well after each. Add flavorings and poppy seeds. Mix flour with baking powder and salt. Add half the flour mixture at a time, alternating with milk, until all have been added.
Pour into loaf pan and bake at 350 degrees, 45-50 minutes. Cool for 5 minutes, then removed from pan.
Combine glaze ingredients and brush or pour over warm bread.

Terra Incognita: Jam and Jelly

I've posted before about the strawberry freezer jam I started making last year, but before now, I've never made any other jam or jelly and have never tried processing it. This year I decided to branch out - or, as at least a few of my readers will appreciate, be a 'risk taker'.
The first thing I tried was peach jam. It's not a true jam, but more like a peach version of my strawberry freezer jam. I just peeled and cut up peaches and cooked them down to a consistency that pleased me. Like my strawberry jam, I added a little sugar to taste - about a tablespoon for what amounted to a pint of jam. I did not process it, so like the strawberry, it's being stored in the freezer.
It looks, smells and tastes wonderful. When I open the jar it's like smelling a fresh peach pie, and the sweetness compliments, rather than over powers, the peach flavor.
For my first attempt at proper processing I decided to try using crab apples. We have two crab apple trees and though one of them didn't fruit this year, the other one is making up for it with masses of pink and yellow fruit. Since we wouldn't be using them for anything else I rationalized that if I failed it really wouldn't have been much of a loss, and at the very least there would be fewer of them to pick up off the grass. On the other hand, If I succeeded we'd have something useful from fruit that would otherwise have gone to waste.

I followed a recipe from the local newspaper, but reduced the sugar to half what was recommended:
Crab apple Jelly
2 pounds, crab apples, washed, stems and blossom ends removed
2 cups sugar
Place the crab apples in a large saucepan and add enough water to cover the crab apples, but not so much that they float. Cook the crab apples, uncovered, until the fruit is soft, about 10-15 minutes.
Strain the fruit and juice through a jelly bag (or if, like me, you don't have a jelly bag, through a cheesecloth or a colander lined with coffee filters).There should about 4 cups of juice. At this point you can choose to continue the process or cool and refrigerate the juice for another day.

Pour the juice into a large pan (I had to change pans midway since the first one I chose wasn't large enough. I had no idea it was going to bubble so much)
The recipe I had said to add the sugar to the juice and heat to 220 degrees, or until the foam darkens in color and loses it's volume. I followed these instructions, testing by a method I'd read somewhere long ago. I placed a saucer in the freezer, and every so often I'd drop a spoonful onto the cold plate and see how the jelly set up.
When it reached 220 I ladled it into a sterilized jar, and set it in boiling water for 10 minutes (I had to double the time for my altitude). It's handy if you have jar tongs, I don't so I ended up using the barbecue tongs.
The recipe said I should have 4 jars, but I only ended up with one. One jar of very thick, dark jelly.

It's sweet and apple-y, but with a hint of puckeriness (Okay, maybe I'm making up words) that regular apple jelly doesn't have. Clive says it tastes like some sweet from childhood he can't place. The consistency though is less like jelly, and more like the jam in the center of a Jammie Dodger. I think I needed to cook it faster, and possibly even put the sugar in later. I'd welcome input from experienced jelly makers.
Next I tried grape jelly. We've had our grapevine about three years now, and this year we had about 25 pounds of grapes. Twenty pounds of them are fermenting away in a bucket in my kitchen, but with the other five pounds, I made jelly.

The process I used was similar to the first, but using:
5 pounds grapes
3 tablespoons pectin
4 cups sugar (the original recipe called for 7 cups)
I washed the grapes and picked them off their stems. I placed them in a large pan with enough water to cover them, but not so much that they floated. I boiled them 10-15 minutes, until they were well broken up. After this mixture cooled a bit, I used first a potato masher - and then my hands - to crush the grapes. I poured this through a strainer and set the juice aside for later processing.
The next day I measured five cups of juice into a pan with three tablespoons low/no sugar pectin. And, using a higher heat than I did for the crab apple jelly, I brought it to a boil, testing as before by spooning small amounts onto a cold plate. I added the sugar and boiled for another minute before ladling it into jars and processing, using the instructions on the pectin package. This time I had enough for six jars, and I've still got juice left over for another time - or for a batch of finger gelatin.
Pumpkin Scones
Another pumpkin recipe for October:
Pumpkin Scones
2 cups all purpose flour
1/3 cup brown sugar
1/2 teaspoons each, ginger and cinnamon
1 teaspoon baking powder
1/4 teaspoon baking soda
1/4 teaspoon salt
1/2 cup butter, cut into pieces
1/3 cup buttermilk
1/2 cup fresh or canned pure pumpkin
1 teaspoon vanilla extract
Course sugar for sprinkling (optional)
Preheat oven to 400 degrees F
In a large bowl, stir together the flour, sugar, spices, baking powder, baking soda and salt. Cut the butter into the flour mixture with a pastry blender or two knives until mixture resembles coarse crumbs.
Add the combined remaining ingredients and mix just until the dough comes together. Do not over-mix.
Transfer to a lightly floured surface and knead dough gently four or five times. Pat the dough into a 7 inch round.
Cut this circle in half, then cut each half into 3 wedges. Place the scones on the baking sheet and sprinkle a little coarse sugar, if desired.
Bake for about 20 minutes or until golden brown. Cool on wire rack
Lavender Everywhere

I'm not a fan of artificial scents, anymore than I'm a fan of artificial food. To me they don't smell nice at all. When I'm in a room with air fresheners plugged in, I can't wait to leave. I avoid the laundry aisle at the store, and don't even like being outside when my downy/bounce loving neighbors do laundry and the smell comes wafting over the fence from their dryer vents. I can't imagine infusing my clothes in this stuff and breathing it all day - or inhaling it from my sheets and pillowcases all night.
But I do like nice smells in my house. If you've been reading my blog for anytime at all, you probably guess one of my favorites is lavender. I use lavender in many ways throughout the house.
This summer I used my stems of lavender from my garden to make lavender wands. I also bought small drawstring bags from the craft store and filled them with lavender flowers to make sachets.
Most recently I made gel air fresheners with gelatin and lavender essential oil. The recipe I used was simple:
1 cup water
2 envelopes unflavored gelatin
1 Tablespoon salt
essential oil
optional: coloring, ribbon, glass pebbles, flower petals, etc.
Method:
Heat water to a boil. Add salt and gelatin stirring to ensure both are completely dissolved.
Stir in about 20 drops of essential oil and coloring if you're using it, adjusting to your preference. Pour into jars and decorate if you like.
With the holiday season coming, I'm planning to find some pretty jars make some with cinnamon and other spicy scents.
Oven Roasted Tomatoes

We're not experts at it by any means. We have our successes and failures, but we do have a few basics that we can depend on that do well, though not necessarily spectacularly, every year, like broccoli or kale. Then there are others that are more unpredictable. Last year we could hardly keep up with the strawberries, this year it's tomatoes.
I don't know if it's the hot, sunny weather we had this year, or if we've done something different that we aren't aware of, but this year we've had more tomatoes than the previous three years at least. The plants have nearly taken over the border they are in, and it's been a trick trying to keep up with all the tomatoes.
We've been managing though, and I've been getting a lot of experience with different ways of preserving tomatoes. The first thing I tried was making tomato sauce. I peeled, pureed and simmered all day. I ended up with two pint jars of tomato sauce, but it took me all day and at least for me, it seemed like a lot of work.
The next thing I tried was just peeling, putting into freezer safe jars and popping them in the freezer. This was very quick and easy, and since I was up to my elbows in tomatoes at the time, quick and easy was a bonus. As far as how good it is, I'll know better when I eventually go to use one of the jars.

The third thing I tried was oven roasting. This has been my favorite so far. I used the roma tomatoes, and simply sliced them in half, spread them on a baking sheet, drizzled them with olive oil and sprinkled them with herbs and garlic, then roasted them at 325 degrees until they were nicely done - about 3 hours.
It's even easier than freezing, and I already know they taste amazing. I have a few ideas of things to do with them - if they ever last long enough to do anything with them. Somehow they always seem to end up being eaten...
What's your favorite thing to do with a bumper crop of tomatoes?
Chicken Marsala

Do you ever make something you haven't made in years and then ask yourself 'Why on earth did I ever stop making this?'
I had one of those moments recently when I made chicken marsala. Everyone in the family has always liked it - including the picky ones. It's fast and easy, so time and energy wasn't the problem. I have no idea why it fell off the menu, but for now I'm just glad it's back.
Chicken Marsala
2 chicken breasts
5 or 6 mushrooms, depending on size and how much you like them
olive oil
1/4 marsala wine
1/3 cream
salt and pepper to taste
- Butterfly the chicken breast and slice the mushrooms
- Heat oil and add the mushrooms and chicken pieces, cooking for a few minutes on each side. Make sure the chicken is done, but don't overcook.
- Add the marsala wine and allow to flame, if you can. I never seem to get it to, so I cook it for several minutes to evaporate the alcohol.
- Stir in the cream and add salt and pepper to taste.
Pumpkin Muffins

It's tough to wax poetic about pumpkin muffins while not two feet away my cat is crunching on a grasshopper he brought in from the backyard. It's a shame, because these are very good muffins. At least I can take double pleasure this beginning of September. Not only is pumpkin season beginning - grasshopper season is coming to an end.
Last year I cooked a pumpkin for the first time, and as I suspected would be the case, the most difficult part of the process was finding the time. But whether you cook your own pumpkin, or buy it in cans, these muffins will not disappoint.
Pumpkin Muffins
1 1/2 c flour
1/2 c sugar
2 t baking powder
1/2 t salt
1/2 t cinnamon
1/2 t nutmeg
1/2 c milk
1/2 c pumpkin
1/4 c melted butter
1 egg
Heat oven to 400 degrees. Grease bottoms of muffin cups, or line with paper or silicon cups.
Mix all ingredients just until flour is moistened. As usual for muffins, don't overmix. The batter will be lumpy.
Fill muffin cups 2/3 full. Sprinkle sugar over the top (I use Billington's Sugar Crystals)
Bake 18-20 minutes. Remove immediately from pan and cool on wire rack.
Grilled Chicken with Rosemary and Lime
This is one of my favorite ways to make grilled chicken more interesting. I love citrus, especially lime and rosemary is one of the herbs I grow year-round since I use it so much.
We made this just the other day - but unfortunately I didn't get a photo. These were exceptionally pretty plates with the deep purple forbidden rice and broccoli fresh from our garden.
Grilled Chicken with Rosemary and Lime
marinade:
2/3 cup lime juice
1/2 cup lemon juice
1/2 cup olive oil
2 T dried rosemary, or equivalent fresh
1/4 t pepper
2 chicken breasts cut into serving sized pieces
Combine ingredients for marinade. Mix well and pour over chicken. Refrigerate several hours or overnight.
Grill until chicken is thoroughly cooked, basting with reserved marinade if desired.
(Not So) Fakes: Homemade 'Poptarts'

I wish I had a better name for these. I think they deserve a name all their own that doesn't make them sound like junk food wannabes. After all, many cultures have their own versions of little pies that fit in one's hand. We're just more familiar with the commercial version, and since that is what people are more likely to know them by, that's what I've been calling them.
I've been making these for several years now. It was a fun activity for my son and me on a winter afternoon. Or any afternoon. We'd make all different kinds. His favorite was one he 'invented' - a S'mores version (pictured above) with chocolate chips and small marshmallow pieces, followed by his second favorite, cinnamon and sugar.
I usually brush with warm golden syrup as a glaze to make them shiny and add a touch of sweetness. You can use your favorite glaze and add sprinkles, too.
Give it a try and let me know what filling is your favorite.
Homemade 'Poptarts'
1 cup unbleached all purpose flour
1/2 cup whole wheat flour
1/2 teaspoon salt
1/2 cup unsalted butter
3 tablespoons cold water
Combine as for pie crust. Roll out and cut into rectangles 2x3 or 3x4 inches . Place rectangle on cookie sheet, spread with jam, cinnamon sugar, chocolate pieces, or whatever takes your fancy. Top with a second rectangle and seal all the way around.
Bake 450, 8-10 minutes. Glaze and add sprinkles if desired.
Scrambled Eggs
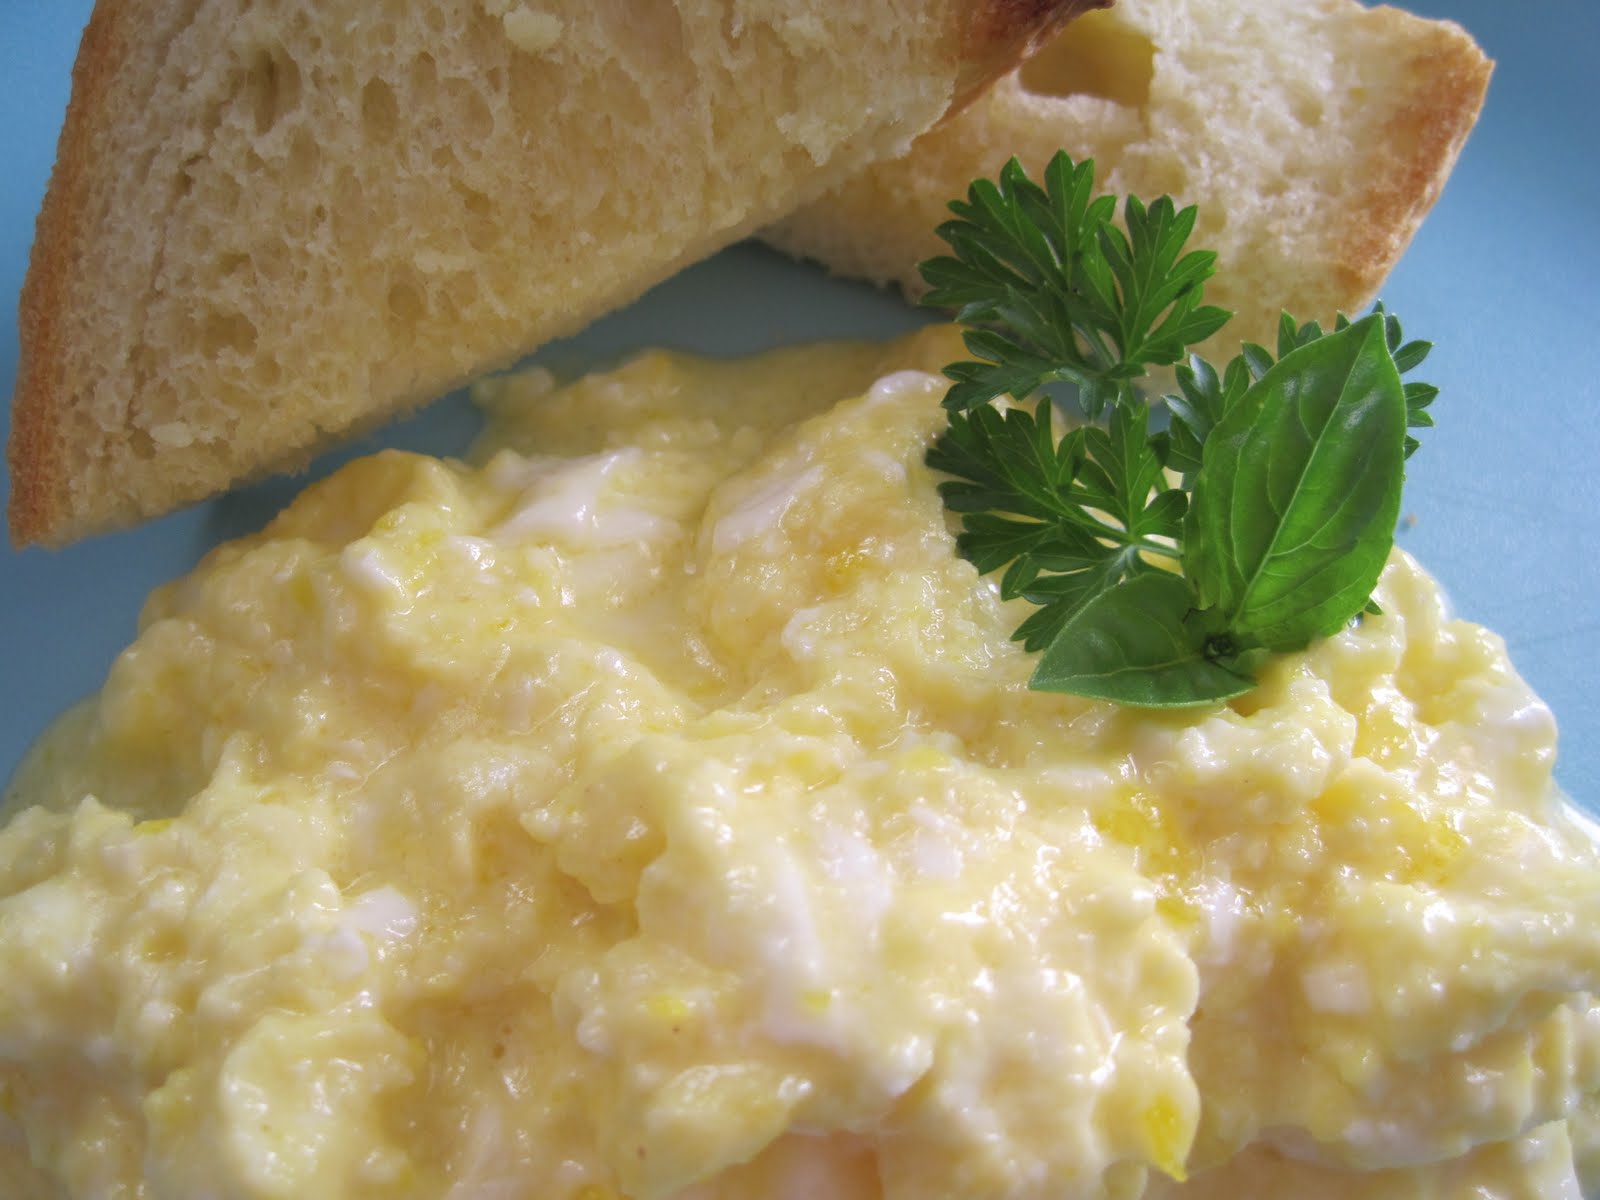
The most recent example was how to make better scrambled eggs. I thought I made good scrambled eggs before - fluffy, souffle like eggs cooked in butter and coconut oil, but now that I've had these, I almost never want to eat eggs any other way again.
I don't usually show step by step instructions, but with these eggs, it's the method that matters.
First step: Throw some butter into a pan and let it get all foamy. I didn't measure mine, but it seems like a bit less than a tablespoon.

Into that golden lake of bubbly, melted buttery goodness, crack two eggs, sprinkle with salt and add a good glug of cream. About a tablespoon or so.

When the eggs are set and nearly cooked, add some more butter and a bit more cream. Yes, really.

Coconut Gelatin

I've been making gelatin cubes from juice for snacks and school lunches for quite some time and thought making them from coconut milk would be a nice change. I have used coconut oil for years, but have never really done much with coconut milk.
I'm always hearing about the health benefits of coconut and gelatin. Here's a simple, hot weather friendly way to get more of both:
Coconut Milk Gelatin
2 cups coconut milk
2 tablespoons gelatin
Measure 1/2 cup coconut milk into a bowl. Add gelatin and allow to stand until softened.
Slowly heat remaining coconut milk to just under the boiling point. Add some of the heated coconut milk into the gelatin mixture. Stir until lumps are gone. Add gelatin/coconut milk to the coconut milk in the pan. stirring to prevent lumps. Continue to heat until gelatin is completely dissolved.
Pour into shallow pan and allow to cool slightly before putting it in the refrigerator. Chill until set. Cut into squares or desired shapes.
Breakfast 'Pizza'

This morning I wanted to make something a bit different for breakfast. We had some good Italian sausage left over from our pizza making the day before, along with fresh mushrooms, mozzarella cheese and some other pizza toppings. I've got dough in the refrigerator, so I could have made more pizza, but we've been eating a lot of bread lately and I wanted to rein it in a bit.
I considered making sausage and cheese omelets, but decided that was a bit too ordinary, and I hoped the pizza look would appeal to the youngest member of the family. The result was definitely not ordinary and, as predicted, was popular with the younger, 'not-so-sure-about-eggs' family member who is now looking forward to trying it again - with pepperoni.
Breakfast Pizza
Ingredients:
pizza toppings: pepperoni, sausage, onions, mushrooms, peppers, spinach - your choice.
grated cheese
eggs
butter
herbs, salt, pepper or other seasonings
Preheat broiler. Prepare the toppings and set aside. Crack eggs into a bowl and scramble with a whisk or fork until uniform yellow color. I used a small pan and two eggs per person. Season as desired.
Melt butter in a shallow, oven safe pan over med-low heat. When butter is foamy, add eggs and swirl to coat bottom evenly. Sprinkle egg mixture with pizza toppings. Top with cheese.
When the eggs are cooked on the bottom, place pan under broiler for a few minutes, watching carefully, until eggs are cooked on top and cheese is melted.
New Stuff
Out shopping recently, I stumbled on these cute silicon baking cups. I think they're just the think to brighten up Laptop Lunchboxes in the new school year!


Flowers in the Kitchen

The first thing I tried was making rose syrup. As usual, I searched the internet and compared recipes. In the end, I tried two different methods and this was the simplest. I used the same method with lavender blossoms to make lavender syrup.
Gather (unsprayed) rose petals early in the morning, wash and place in a jar.

Make a simple syrup:
1 c water
1 c sugar
Mix in a pan and heat until sugar is completely dissolved.
Pour over the rose petals and allow them to steep.

Strain syrup when cooled, cap and store in the refrigerator. The picture does not do it justice. I didn't notice at the time that it was dark and brown looking. If I had, I'd have taken another one. In actuality, the syrup is a pretty, pale pink with a subtle rose scent and flavor.
I had quite a lot of lavender, so after the syrup I moved on to baking with lavender. There were so many ideas out there, but in the end I settled on this recipe for Lavender Biscotti and was not disappointed. They were easy to make, and had just the flavor I was hoping for.

Beware - according to my family, they are 'addictive'.
Granola
We don't eat cold cereal since for the most part, it's expensive, highly processed and pretty much useless in the nutrition department. Some days, though, you just want something quick and crunchy in the morning - or to top your yogurt with. On those occasions, this granola is just the thing. It's soaked, so it's even more nutritious and easier on the digestion.
This recipe is just a basic starting place. You may need a smaller/larger amount, or prefer another combination of spices. I like for the granola itself to be more background for the toppings, so you may need more spice/sweetener in yours.
Soaked Granola
* 8 c. rolled oats
* 2 cups nuts, sunflower seeds or a combination
* 1/2 c melted butter
* 1/2 c. melted coconut oil.
* 1 1/2 c. yogurt
* 2 cup water
* 3/4 cup raw honey or maple syrup
* 1 tsp. sea salt
* 1 tsp ground cinnamon
In a large bowl, mix oats, butter, oil, yogurt and water. Add oats and sunflower seeds and/or nuts. Cover and let sit out for at least 24 hours. If it's cold in my kitchen, I usually put mine in the oven with the light on.
When the soaking time is up, mix the remaining ingredients with the oat mixture. Spread evenly on dehydrator sheets or on two large cookie sheets oiled with coconut oil. Bake either in the oven at the lowest temperature or in the dehydrator until it is dry and crispy. In my dehydrator it takes about 12 hours. Check every so often, breaking apart large pieces as it cooks.
When it is crispy, and has cooled, break into smaller pieces and store. I keep mine in large mason jars and using those to refill a smaller, easier to handle container.
To serve, I have a little 'granola bar' with an assortment of chopped nuts, dried fruits, flaked coconut, grated chocolate and of course, yogurt or whole milk, so that my family can have whatever flavor combination sounds good to them at the time.
Fruit and Cream Oatmeal
No food, other than asparagus, says 'spring' to me quite like strawberries. There is nothing like the sight and smell of a basket of beautiful, bright, red, ripe strawberries. I avoid buying them out of season, so when strawberry season comes around, we take full advantage of it. I also buy organic since strawberries are one of those fruits with high pesticide levels.
From breakfast to dessert, strawberries put an appearance in every meal in our house this time of year. Today we started the day with strawberries and cream oatmeal. I don't mean those little packages of 'strawberry flavored' oats with 'creaming agents' and artificially flavored 'fruit pieces' (dehydrated apples) along with a considerable amount of sugar, some artificial color and a sprinkling of transfats.
I mean honest to goodness oats, strawberries and (not ultra-pasteurized) real cream. I use steel cut oats because I like the texture, and soak them overnight in warm water with a spoonful of yogurt. In the morning I add a bit of salt and some butter and cook them on low while I get ready for the day.
When the oatmeal is the consistency we like, it's ready to spoon it into bowls and top with strawberries, cream and a little fresh maple syrup, if necessary, to sweeten.

The best thing is when strawberry season is over, there are plenty of fruits left to choose from. I'm already looking forward to peach season.
Strawberry jam

One of last summer's 'Terra Incognitas' was making strawberry jam. My strawberry plants had finally hit their stride and I had more strawberries than we could eat - and we can eat a lot of strawberries.
I decided to try making jam. I started looking into recipes and 'how tos', but every recipe I found seemed more like strawberry flavored sugar to me. The ones that didn't use sugar, tended to use artificial sweeteners, which in my mind is worse, and when I read about reducing sugar, recipes cautioned that changing recipes could result in an unsafe product.
Since this was my first foray into jam making, I elected to avoid the whole issue and go with freezer jam. I tried various methods, some using cornstarch or gelatin - some using both.
In the end the method I liked the best involved neither - it uses apples for pectin and sweetness. I don't recall where I got the idea - if anyone knows, please remind me so I can credit it.
2 cups strawberries, hulled and sliced
1 large apple, peeled and sliced
1/2 cup water
2 teaspoons sugar (optional)
Mix together and simmer until thickened - about an hour to an hour and a half. Use a potato masher to blend any large chunks. Pour into jars and store in freezer.
It's so easy, it was almost no effort to make enough to last all winter, and opening each jar was like a hint of spring in the dead of winter.
We just ran out a couple of weeks ago so I made a batch last weekend with the early strawberries from the store. It won't be long, though, before our own plants will be producing and our freezer will again fill with little jars of springtime.
Salad Days
Spring has definitely arrived. The trees are budding, spring bulbs are blooming, grass is greening, migrating birds are returning - and so is my interest in eating salads.
I love having a variety of ingredients in my salads. What I don't love is how long it takes to prepare it. I tried making a big salad on weekends and taking out small amounts daily. It was okay for a few days, but it was the same salad every day and always ended up looking like nothing anyone would want to eat long before the next weekend rolled around.
I tried individual containers of ingredients that I could pull out and throw together each day. That worked as far as having fresher ingredients and more variety, but filled my refrigerator with little containers. Occasionally I'd end up 'losing' one or two little containers at the back of the refrigerator and the ingredients would spoil, which is always annoying.
For a few weeks now I've been using silicon muffin liners to streamline school lunch packing. When I cut up vegetables and fruit for my son's Monday lunch, I fill up eight additional muffin liners for the rest of the week, (four with fruit and four with vegetables) and store them in a covered container. In the morning all I have to do is pull out one of each and add them to his laptop lunchbox.
I figured with larger muffin liners and a larger container, I could create what amounted to a mini salad bar in one container. In the end, I bought two containers the same and used one for salad greens, and the other for toppings. I bought a mandoline at the same time, so preparing the ingredients was even easier.

The photo is just a few containers, using what I had on hand. Like all things I'm sure it will evolve over time. The container is there - it's just clear. It's one of those snap lock types, so it should keep things from falling out - or drying out. And if it's too air tight, there is a little vent in the lid.
Terra Incognita III - Homemade Ketchup
One of my 'big plans' last summer was making ketchup from my own tomatoes. There was one slight problem though - the lack of cooperation on the part of my tomato plants. We had enough tomatoes for eating, but not the bumper crop that I would have needed to make a decent batch of ketchup.
In the end I compromised and started with store bought tomato paste. I bought the good stuff though - organic tomatoes in a jar rather than a can, and cultured it for added health benefits.
I looked at a number of recipes, both in Nourishing Traditions and in various places online, but knew I'd found what I was looking for when I saw this recipe.
I used the recipe as is, other than leaving out the mustard, since I didn't have any on hand. It smelled so good as I was mixing it, I almost wanted to eat it with a spoon.

A few days later, it was ready to eat. My family's verdict: good stuff :)
Broccoli Salad
I know it will snow again - in fact the forecast says we'll be getting some next week. But the days are getting longer, the sun is higher in the sky, and it's feeling like spring to me. I've packed away my sweaters and brought out the sandals. Even my menus are transitioning to more warm weather food. Lately, I've been craving soup less, and crunchy salads more.
Most of the time it's a big green salad, but occasionally, especially when we grill hot dogs or burgers, I like this one. The first time I had it was at a family potluck when two guests brought it. Even with double the amount, there was none leftover. The two salads had slightly different ingredients, so I combined what I liked best about each and came up with my own. Again, it's a small amount for my small family, but is easily adjusted

Broccoli Salad
Large head of broccoli, trimmed and divided into bite-size pieces and briefly blanched to be crisp and bright green
1 small red onion, finely diced
6 slices bacon, fried and crumbled
1/2 cup sunflower seeds (Some recipes use cashews or other nuts)
1/2 cup dried cranberries
1/2-3/4 cup plain yogurt (I use yogurt since we don't like mayonnaise)
1 Tablespoon honey
2 Tablespoons apple cider vinegar
Combine the broccoli, onion, sunflower seeds, and cranberries in a large mixing bowl. Mix the yogurt, honey, and vinegar together and pour over the other ingredients.
Toss and refrigerate. For best results, add the bacon just before serving.
Chicken and Artichoke Casserole

Years ago when we were traveling, I had something like this in a restaurant. I figured it wouldn't be that difficult to make something similar, and this is what I came up with. I have a small family, but we get enough for dinner one night and lunches the next. Adjust the amounts as needed.
The ingredients:
chicken breast
butter
mushrooms
flour
chicken stock
artichokes
salt and pepper to taste
Melt about two tablespoons butter in a wide frying pan. Cut the chicken into serving sized strips. Add them to the butter and brown them slightly. Remove from the pan and place in a casserole dish or crock pot along with the artichokes.
Slice the mushrooms and add them to the pan (along with more butter, if needed) and cook for a few minutes until they soften. Stir in two tablespoons of flour. Cook over low heat for a few minutes to make a thick paste.
Gradually add a pint of chicken stock (homemade if you have it), stirring continually to avoid lumps.
Pour over the chicken and artichokes. If not using a crock pot, bake 350 degrees until sauce is thickened and chicken is done.
Yogurt
 For years I didn't think I liked yogurt. Of course, I was eating low fat, commercial brands that market themselves as healthy but really contain lots of sugar and additives (not to mention low fat isn't as healthy as we've been led to believe). Then one day I bought Fage/Total full fat Greek Yogurt and I realized it wasn't that I didn't not like yogurt. I just didn't like 'yogurt'.
Over the years, yogurt has become a staple in our house. It's my son's favorite thing to eat when he gets home from school. He enjoys mixing his own rather unique blends. Most days I have my own unique blend for breakfast.
I also use it for anything that usually calls for mayonnaise or sour cream. I know it's a common practice of those cutting calories or fat, but considering my yogurt actually has *extra* fat, that's certainly not an issue in our house. My husband has never liked mayonnaise and though I used to, I stopped eating it because it was too difficult to find a brand that didn't contain soybean or similarly unhealthy oils.
Recently I discovered it's amazing in place of buttermilk. Biscuits, muffins, scones and pancakes are softer, lighter and fluffier. The first time I tried this with pancakes my family wanted to know what I did differently - and strongly suggested I make this alteration to the recipe permanent.
It didn't take long before I was spending a significant amount of money every week on yogurt. It seemed like such a waste when so many others I knew I were making it at home.
I read several websites and experimented a bit on my own and came up with a method that works for me. I have been making small amounts several times a week, but am thinking of doubling it and trying to get away with once a week. Right now I'm using:
16 oz whole milk
4 oz cream
1/2 t gelatin
Measure the milk and cream into a pan. Sprinkle the gelatin on top of the milk/cream and allow to stand a few minutes. I know many recipes suggest powdered milk to thicken the yogurt, but I didn't want to use it since it's not a healthy product. Gelatin, on the other hand, supplies added nutrients and we like the ever so slightly gelled texture.
Slowly heat to 180 degrees. I use a thermometer since I'm not good at guessing. Sometimes if I've been baking, I put the pan in the oven instead of on top the of the stove to use the residual heat.
Remove from heat and allow to cool to 110 degrees
When it's cooled, stir in a few tablespoons of reserved yogurt. I used Fage to start with, but now use some of my previous batch. I've heard it loses strength after a while, so every so often I'll buy a yogurt and use that to freshen it up a bit.
Pour into jars and keep warm and keep at 100 degrees for at least 8 hours.
This is where it really varies. Some people use a yogurt maker. Some people use crock pots, or styrofoam ice chests. I've even heard you can incubate it in the hot car on a warm summer day. In the summer, I leave mine overnight in the oven with the light on. In the winter, that doesn't stay hot enough, so I use a heating pad and a cardboard box.
I put a towel in the bottom of the box, put the heating pad on that, with another towel on top of it. The jars go in next and are covered with another towel. I put the thermometer in with the jars so I can keep an eye on the temperature.
Leave it overnight, or about 10 hours.
Chocolate Truffles
I've got the day off today, and like most people, I've got a long 'to-do' list. As usual, many of them have to do with spending time in the kitchen. One of these is especially pleasant, though - making chocolate truffles. (I know..more chocolate)
For quite some time I was fooled into thinking they were difficult to make - possibly even beyond my skills - so I didn't even try. Now that I know how simple they are, I've made them a few times. It's a good thing they're so easy to make - this year I decided to make loads of them to give away for Valentine's Day.
Like many of my recipes, I'm not even sure where I got it. Usually I study a number of recipes, try a few that appeal to me the most, make a few changes here and there, and end up with something that works for me. Sometimes I'm very organized and take notes - other times...not so much - and I have to try to remember what I did, or worse, start all over again.
This is the recipe I've been using the last few years. It's a basic, rustic looking truffle. Maybe someday I'll experiment with flavorings, coatings and frills. On the other hand....maybe not.
Chocolate Truffles
8 oz dark chocolate (I used Girardeli 60% chocolate chips today)
1/2 C cream
2 T butter
Cocoa powder for dusting
Measure the chocolate chips, or break up chocolate if using bars, into a medium sized bowl. Heat the cream and butter until almost boiling. Pour over chocolate and stir until the chocolate is completely melted, and beautifully smooth and shiny. Refrigerate.

Once the mixture is set, use a teaspoon or other small scoop to measure out small amounts of the chocolate. Working quickly with cool hands, shape small amounts of the chocolate into balls and roll in cocoa powder. Return to the refrigerator until firm.
I usually do this part in two stages. I use two spoons to drop small mounds of chocolate onto a paper lined baking sheet, refrigerate, then shape and coat, then refrigerate again.
Allow to return to room temperature before eating. Share and enjoy.
Oh, and when everyone is impressed with how clever you are and how many hours you must have worked to make them, feel free to simply smile modestly and thank them.
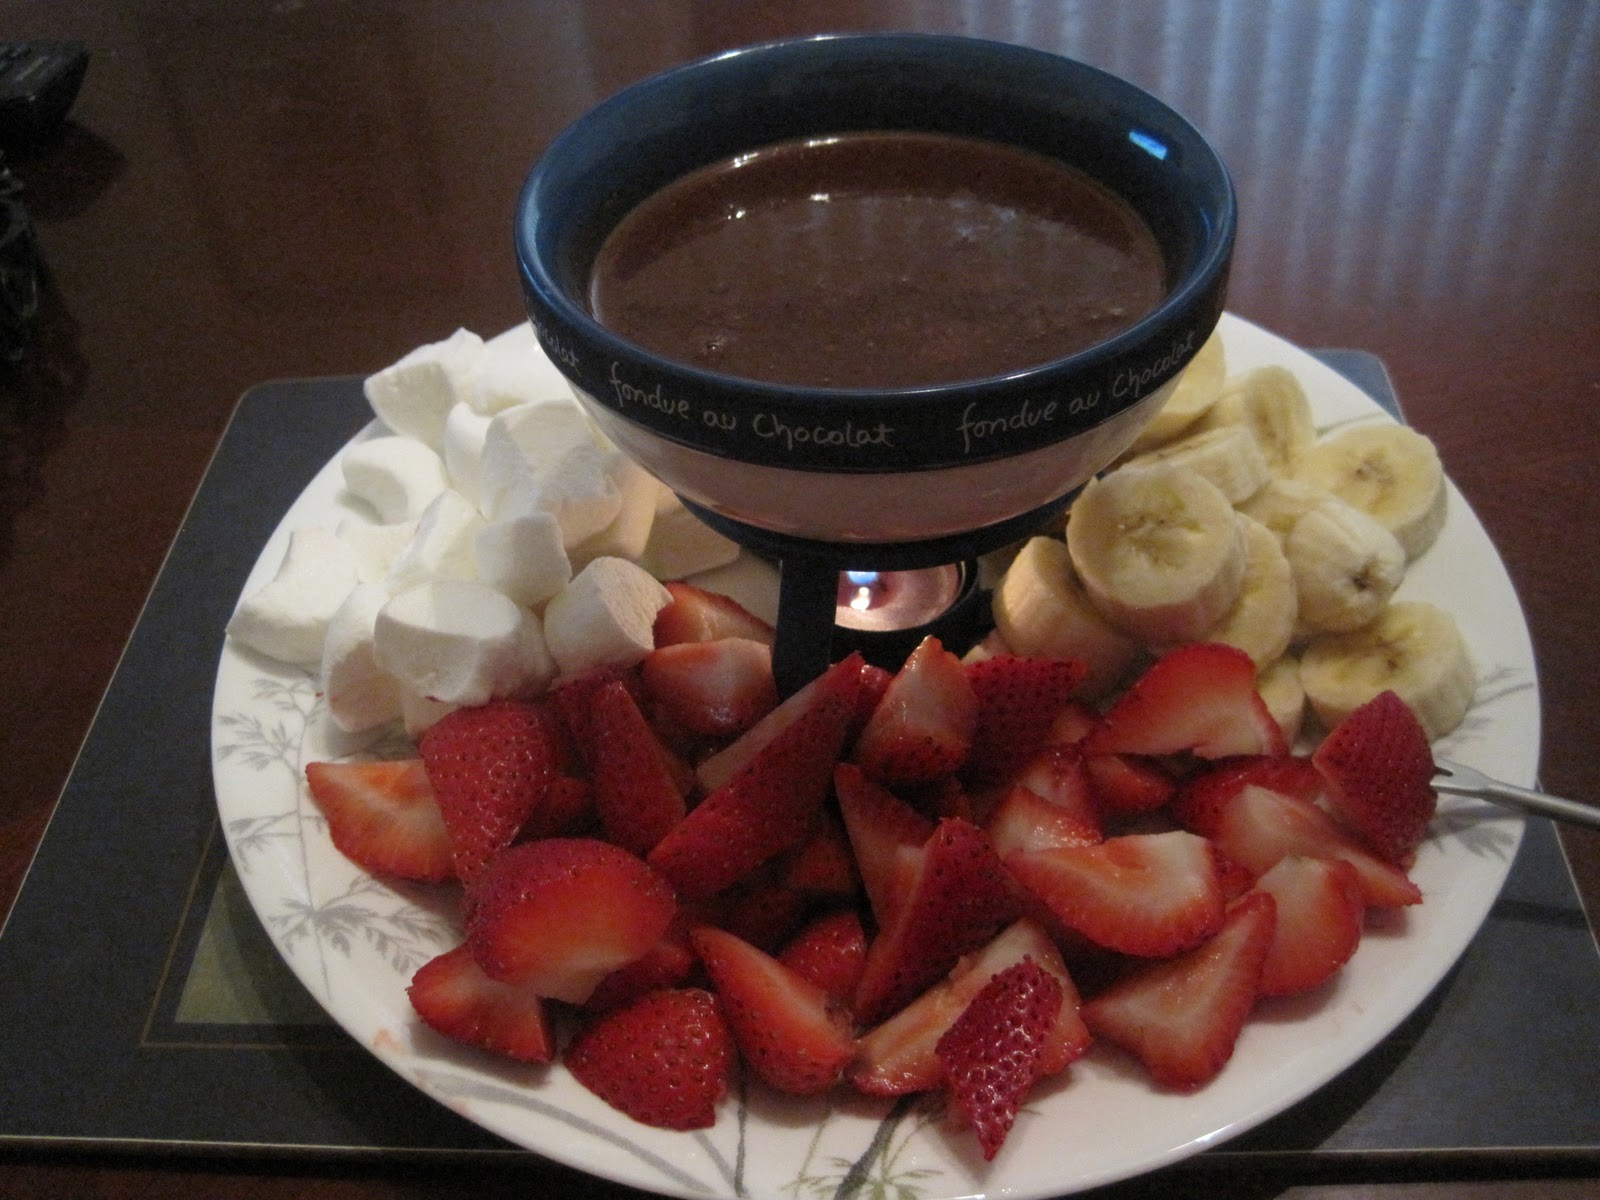
Valentine's Day Chocolate Fondue
I don't know if there are other couples who don't go 'out' for Valentine's Day, but we haven't done that for several years. We give cards, but skip the 'date' or 'gift' part. We just don't miss any of it, so we don't bother.
Whatever else we might do depends on what appeals to us at the time. No matter what we end up doing, one thing remains constant - our traditional Valentine's Day Chocolate Fondue.

Though it's quite simple to make, to me nothing feels quite so luxurious. I usually use good chocolate even for every day uses, but for this I splurge on even better quality chocolate and buy strawberries out of season (something I don't normally do).
The choices of dipping items are usually fruit, though marshmallows are often included since they are a favorite of one particular family member. Besides strawberries, I usually include whatever other fruits are available at the time and seem like they would work well. I've tried cookie/cake type things, like lady fingers or shortbread when I've had them on hand, but the fruits are more popular.
Chocolate Fondue
1 cup heavy cream
12 ounces good quality dark chocolate, chopped (I used Callebaut)
1 teaspoon vanilla
Heat the cream in a medium saucepan over medium-low heat until hot, about 2 to 3 minutes. When hot, add the chocolate and stir until it is just melted and smooth. Stir in vanilla. Transfer to a warm ceramic fondue pot and thoroughly enjoy :)
Whatever else we might do depends on what appeals to us at the time. No matter what we end up doing, one thing remains constant - our traditional Valentine's Day Chocolate Fondue.
Though it's quite simple to make, to me nothing feels quite so luxurious. I usually use good chocolate even for every day uses, but for this I splurge on even better quality chocolate and buy strawberries out of season (something I don't normally do).
The choices of dipping items are usually fruit, though marshmallows are often included since they are a favorite of one particular family member. Besides strawberries, I usually include whatever other fruits are available at the time and seem like they would work well. I've tried cookie/cake type things, like lady fingers or shortbread when I've had them on hand, but the fruits are more popular.
Chocolate Fondue
1 cup heavy cream
12 ounces good quality dark chocolate, chopped (I used Callebaut)
1 teaspoon vanilla
Heat the cream in a medium saucepan over medium-low heat until hot, about 2 to 3 minutes. When hot, add the chocolate and stir until it is just melted and smooth. Stir in vanilla. Transfer to a warm ceramic fondue pot and thoroughly enjoy :)
Snow Cream
Like most of the country, we've had interesting weather lately. While some places were getting massive amounts of snow, we had serious cold.
Eventually we got some snow, too. About six inches of fluffy whiteness - perfect for making Snow Cream.

Growing up in a snow-less part of the country, Snow Cream wasn't part of my childhood, and I confess I'd totally forgotten about it until just a few days ago. Snowy days have always been much more likely to make me think 'hot chocolate' rather than a bowl of creamy vanilla snow. But the few times I had it as a teenager were fun and I was looking forward to introducing my family to it.
 Luckily, we didn't have long to wait. The snow started falling around noon and continued into the night. By dessert time, the bowl we'd set outside earlier in the day was filled to overflowing with fluffy, new snow.
I didn't really measure the ingredients, but this is approximate:
Snow Cream
1/2 c fresh, good quality cream
1 Tablespoon unrefined sugar (or honey or (real) maple syrup)
dash vanilla
Mix until well blended.
Gently stir into a bowl of clean, fresh snow.
Spoon into bowls (chilled bowls work best) and eat immediately.
The weatherman says we should get several chances to perfect our recipe this week
Subscribe to:
Posts (Atom)